#1 How To: Building a Website from Scratch
Building a website from scratch is not as difficult as you think. In this first post I’m creating as part of a series of How To’s – “#1 How To: Building a Website from Scratch”, I’ll show you just how easy it is to build a website from scratch without any formal training.
Ten years ago or more, to build a website you had to have a good working knowledge of HTML and programming. However, today with all of the tools and technology available you don’t need any formal training at all. I am living proof that anybody can build a website from scratch. All you need is access to the Internet and a working computer or tablet. I’ve presented 6 steps to building a website from scratch. Just follow the recommendations and in less than 30 minutes your website would be up and running.
Step 1 – Choose a Domain Name
The first step to building a website from scratch is to choose a domain name. But to do so you need to identify your niche. This helps with the choice of name. However, you can literally pick any name and brand it around your niche using the correct message and keywords for search engine optimization (SEO). For instance, Apple sells computers not fruits. Amazon is an open platform to buy and sell goods and services and not river tours on the Amazon river. So go ahead pick a name.
Step 2 – Purchase and Host Your Domain
Once you’ve selected a name you need to check to see if it’s available and then purchase and host it. There are many hosting platforms out there. But if you are looking for a hosting package that comes at a flat fee with added features such as security, SSL, spam protection, speed boosting, etc. then my number #1 recommendation is to host your site at Wealthy Affiliate.
Here’s What You Get in the Hosting Package at Wealthy Affiliate
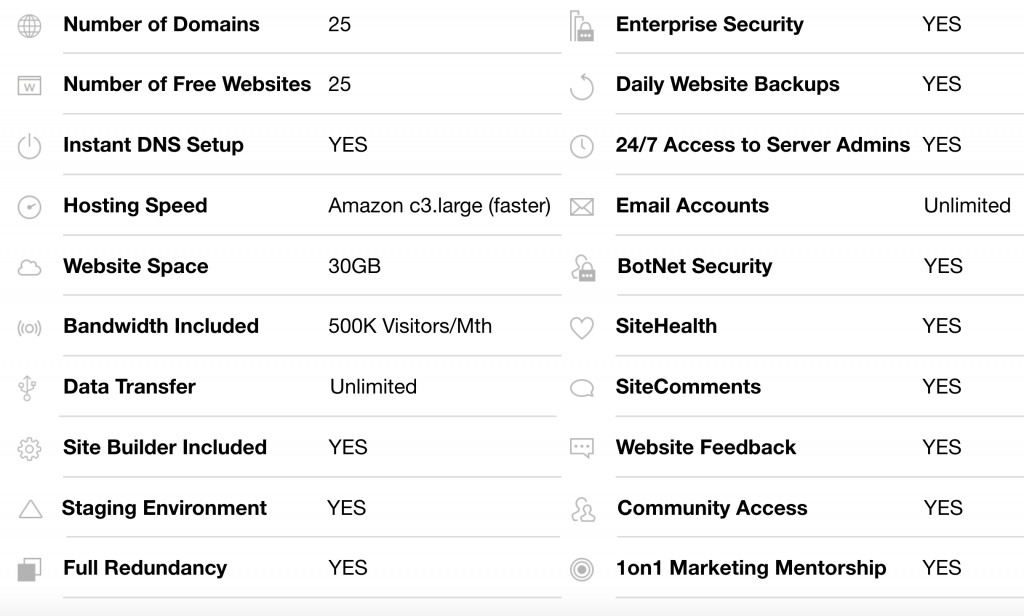
Hosting at Wealthy Affiliate is included in a wider platform that includes training, tools and other technology needed for your online business; all for a Flat Monthly or Annual Fee
Step 3 – Build Your Website
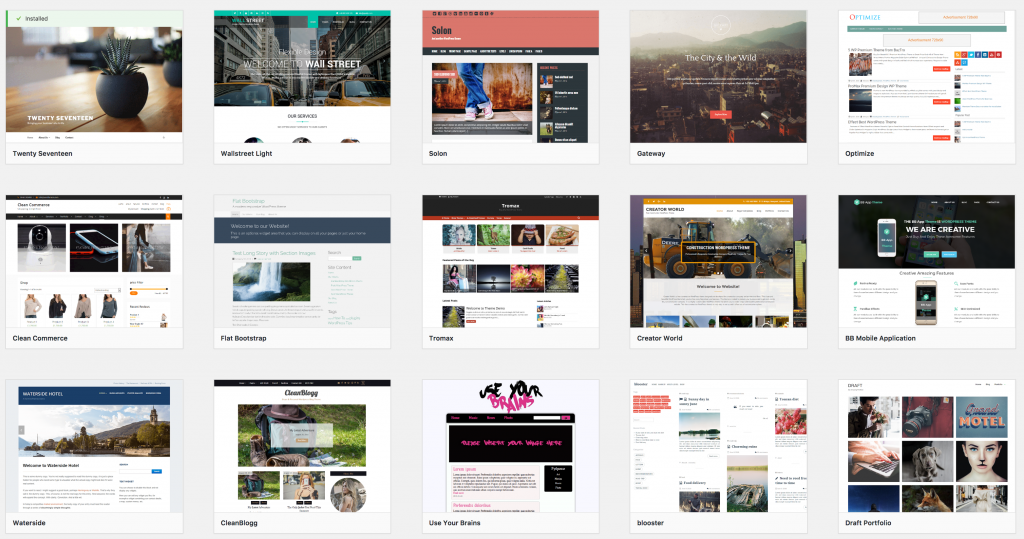
The first step to building your website is to choose a theme. There are lots of free themes available at WordPress. One of the reasons I highly recommend hosting at Wealthy Affiliate is that the premium package comes with a wide range of paid themes already and waiting for you.
I recommend that you choose a simple theme. Remember that the theme you choose will ideally be the core of your brand image to your (potential) customers. In addition, you should pick a theme that does not require too much work. I recommend choosing a theme that is easy to navigate and friendly on the eyes. If your theme is too busy then you can put off your visitors. It is best to choose a theme with a white, clean background with dark grey or black text. Sans serif text is also recommended but not highly critical.
The real building blocks of your website is content – rich, high quality, easy to read and useful content. The theme, while pretty, isn’t what will convert your visitors into paying clients. It is your content that will do that.
A Selection of WordPress Themes included at Wealthy Affiliate
Step 4 – Set up Key Pages
There are a few key pages that you should consider including when building your website. To add a page using the Wealthy Affiliate platform, click on SiteRubix and select SiteManager. This will then take you to your WordPress website admin area. In the admin area, click on Pages and select Add New. In the heading field enter the name of your page.
Here are the four key pages that every website should include – About Us, Contact Us, Privacy Policy, Disclaimer.
1. An About Us Page
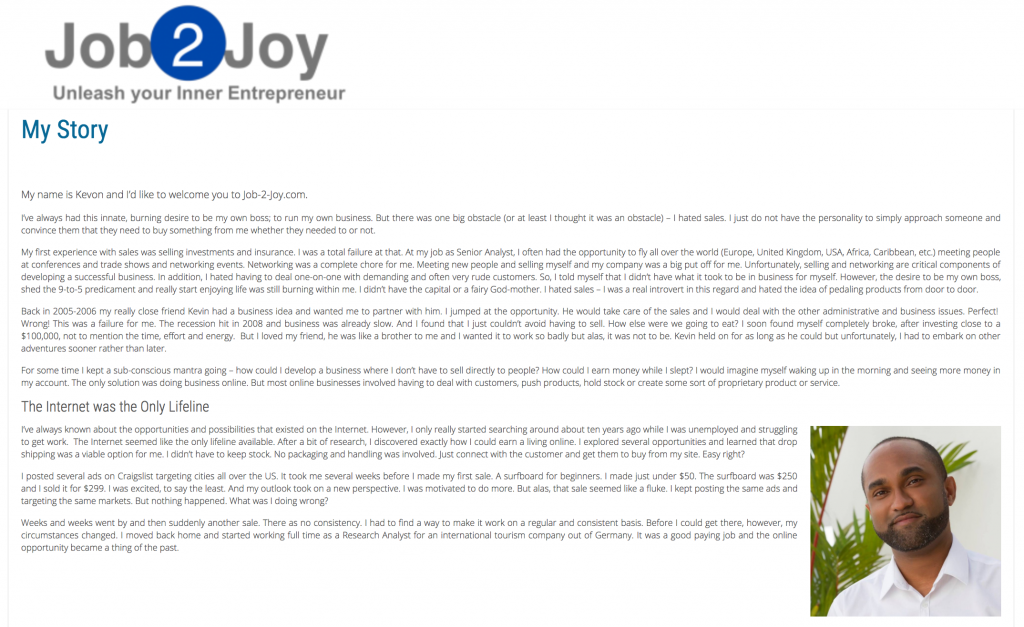
Your About Us page is critical to building a website. The About Us page gives your website a personal touch. Visitors see you as a human being and real person and that helps to build trust. Without trust your visitors will not buy from you. Writing an About Us page is not hard to do at all. First you need to write in the first person. Write the way you would carry on a conversation with a friend. Have a look at this post I created – see point #1 – Tell Your Story. That post talks about how to tell your story in a personal and authentic manner. You could call the page ‘About Us’, ‘About Me’ or any variation. On my website, I used ‘My Story‘.
2. Contact Us Page
A Contact Us page is also important. You want to give visitors an opportunity communicate with you. They may have questions or need help with something in particular and the Contact Us page is a good way to do that. If you wish you may add an address, phone number and email contact. This is even more important if your are operating business offline as well. As a blogger or affiliate marketer adding address and contact number is not critical but it could help create the ‘real person’ effect. People my never call you but knowing that they can helps create trust.
To create a contact us page you may use a plugin for that. There are lots of plugins on WordPress – Contact Form 7 is a good one to use. There are some that are paid and others that are free. Personally, I use Google Forms for my contact form. Google Forms is really easy to use and implement on your website. All you need is a Gmail account to start. As a matter of fact, I recommend getting a Gmail account for many other features that will help you in your online business. To set up your Contact Us page using Google, go to docs.google.com/forms. You’d be asked to sign in and then you’d be taken to a page like this:
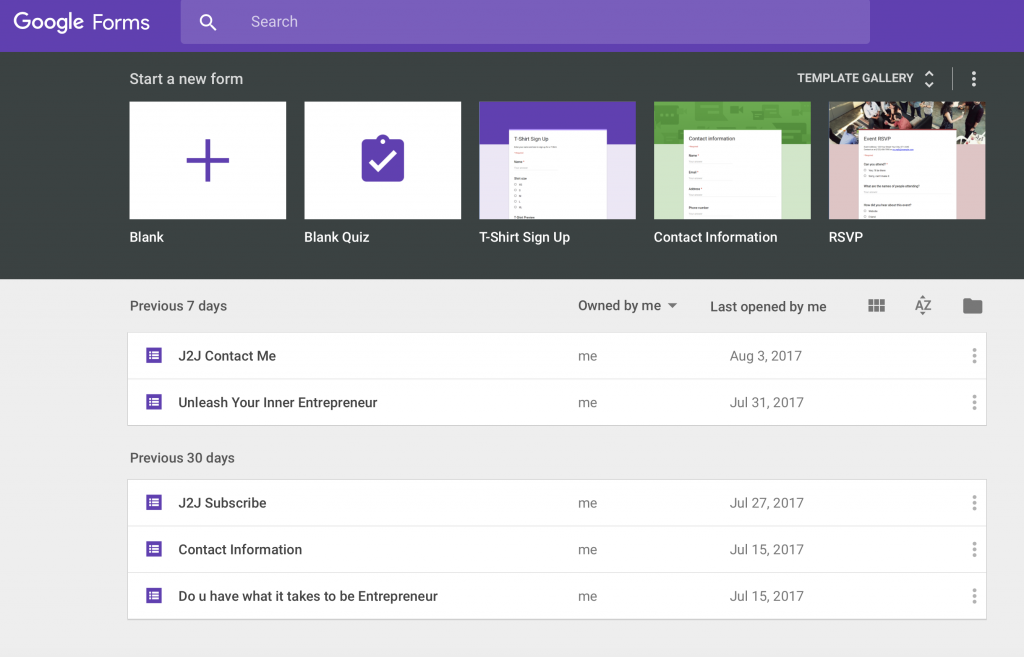
Select Blank Form and follow the instructions in the image below. Where it says Untitled form, enter appropriate introductory text. For the introductory text you could simply say what you want your visitor to do and how you can help. I always recommend that you say something about respecting your visitors information and that you won’t spam them. You could enter this in the sub-heading below the Untitled form area. For your first ‘question’, just say Email. Leave it as a short answer field, select the appropriate item from the drop down menu on the right. For the email question you want to make this a required field. This can be found at the bottom right of your question. Once this is done repeat the process two times for the Name field and for the Comment field. You could decide if you want them to be required or not. To add a question just click the + symbol on the right panel. See image below for instructions. You may also wish to see what I did with my Contact Us page.
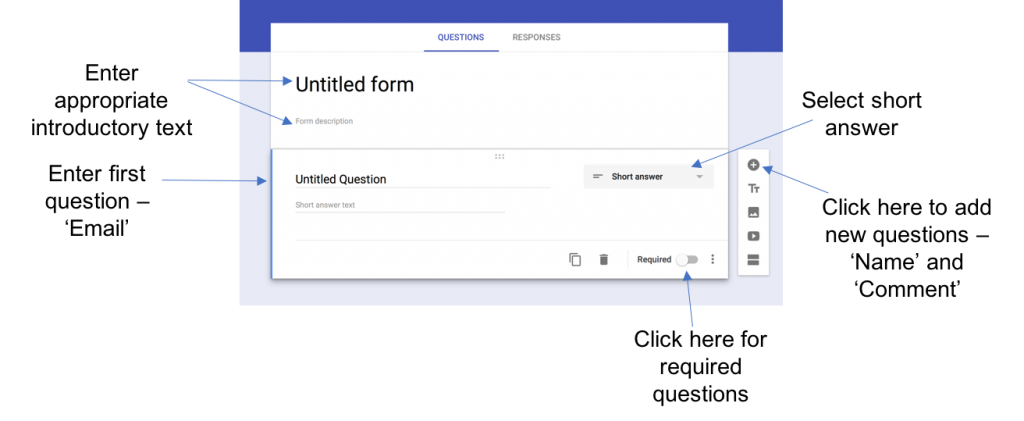
Once you’re finished with the form there are two additional steps required. You want add the form to you website and you want to be able to capture the information gathered.
Embedding Your Contact Us Form on Your Website
In order to embed your form on your website, you first need to create a blank Contact Us page. Do this in your website admin area. Then go to the Google form and on the top right hand corner select the Send button and a pop up screen will show up. Look for the < > symbol and select it. You can adjust the width and height of the form. This will determine how it shows up on your website. For my page, I chose a width of 1000 and a height of 900. You can play around with this until you get the impact you want. Then you want to click Copy. In the admin area of your website, go to the blank Contact Us page and click edit. In the area where you go to enter text or images select the tab on the top right hand side that says Text (it is next to the Visual tab). In this area paste the copied text from your Google form. Before you publish you should preview the page. You would see the Preview button at the top of the right hand panel. Once you are satisfied you may click Publish. And voila, that’s your Contact Us page. Notice for my contact page I use Contact Me, instead of Contact Us. It all depends on your situation.
Capture Information from Your Form
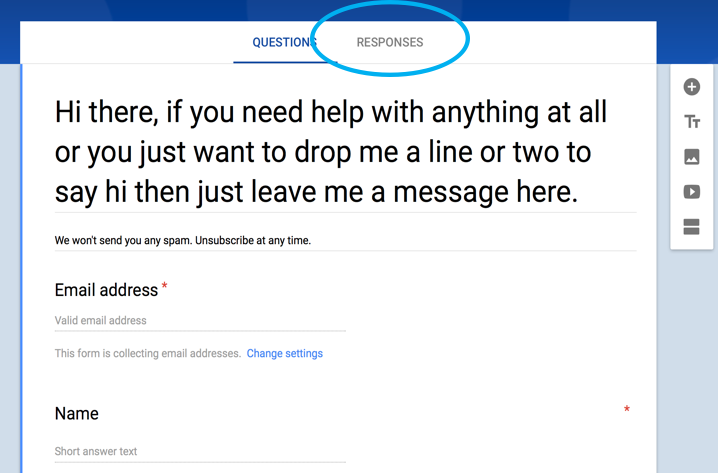
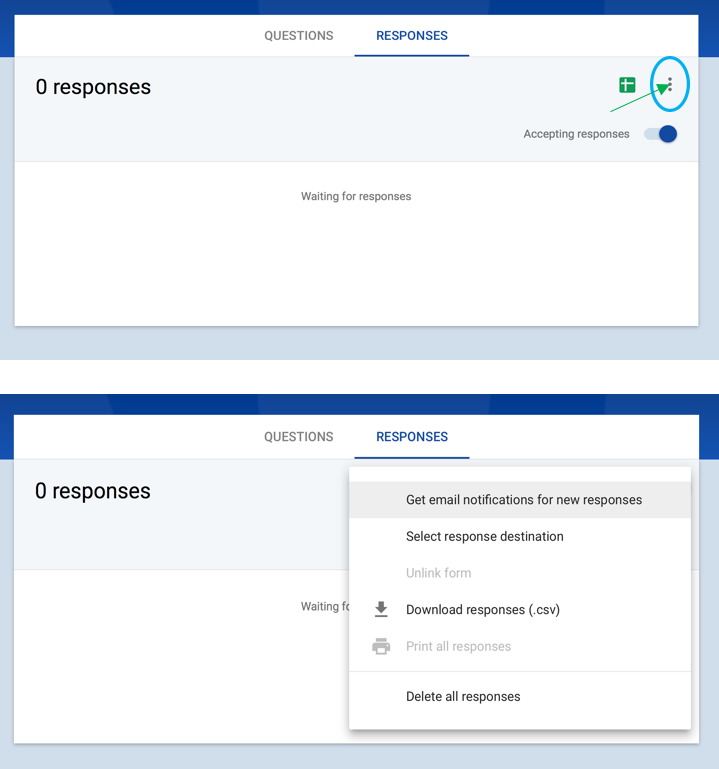
Once your form is completed, click on the Response tab (as shown in the image below). On the top right side you’d see tree vertical dots. Select this icon and a list of options will show up. Select the one you prefer. You can choose to have the responses delivered to your email address or you could send it to a spreadsheet. Or you could manually download responses on a regular basis. Select the option that best suits you.
3. Privacy Policy and Disclaimer Pages
The Privacy Policy and Disclaimer pages are necessary legal pages that are there for your protection as an affiliate marketer or online entrepreneur. These are standard pages and can easily be copied from any site. You can feel free to copy and paste my Privacy Policy and Disclaimer pages. Just replace the name of my website with yours. You may change a few text to suit your circumstances. Generally, these pages remain unchanged. So go ahead and do that now. Add these two pages, copy and paste my text, and create your page. It’s that simple.
Step 5 – Start Creating Content
 In this first How to: Building a Website from Scratch, one of the most critical lessons I’d like you to take away is the importance of content. Content is the lifeblood of your online business and the building blocks of your website. Without content your visitors have nothing to see and do at your online destination. They’d show up and leave right away. And you do not want that to happen. Content gives you more authority. It’s no coincidence that the word ‘author’ is part of the word ‘authority’. The more you write the more authority your website will develop with the search engines. Google will rank your site favorably and as you add more and more content over time your ranking will improve and eventually your website will start to show up on the first pages of Google, Bing and Yahoo searches.
The first step in creating content is to have a plan. When I started building content I brainstormed nearly 100 ideas. So go ahead and develop your ideas. Do about five to start with. The content ideas must be built around your niche.
After you develop content ideas, you want to use a powerful keyword tool to get the right keywords that would yield optimal search results. Click here to access the Wealthy Affiliate Keyword Tool and get started with your keyword research.
Enter your keyword in the required search field in whatever keyword tool you choose. Ideally, you want to use long tail keywords that has some traffic (over 100) but with low competition (QSR of less than 100). For instance for this post the keyword traffic is 5,049 searches per month and the QSR competition is 3. That’s probably as good as it gets.
Once you have settled on a keyword selection for your post start creating your post. To do this go to your WordPress admin area – Chose SiteRubix – SiteManager in the Wealthy Affiliate platform and sign in from there. Once in the WordPress admin area select Post on the left hand panel and click Add New. Give your post a title – this should be the keyword selection you researched earlier. To create your post go in the edit area and start writing. Click here to see some of the basic principles of writing engaging content that converts.
Write from the heart and be opinionated. Add headings and break up the content into small paragraphs or sections. Add appropriate images where necessary and videos if needed.
And there you have it. Your first post is up and ready. Aim to have between 2 and 5 posts per week to leverage the power of organic search.
Step 6 – Add Plugins to your Website
Plugins are software that you add to your website. These software have specific functions that are not typically included as part of your basic website set up. With the Wealthy Affiliate platform there are a number of plugins that come pre-installed on your website. These include the All-in-One SEO plugin, EWWW Image Optimizer and Google XML SiteMaps. So that’s already done for you and you don’t need to worry about that. If you’re not hosted at Wealthy Affiliate platform then I suggest you get these plugins.
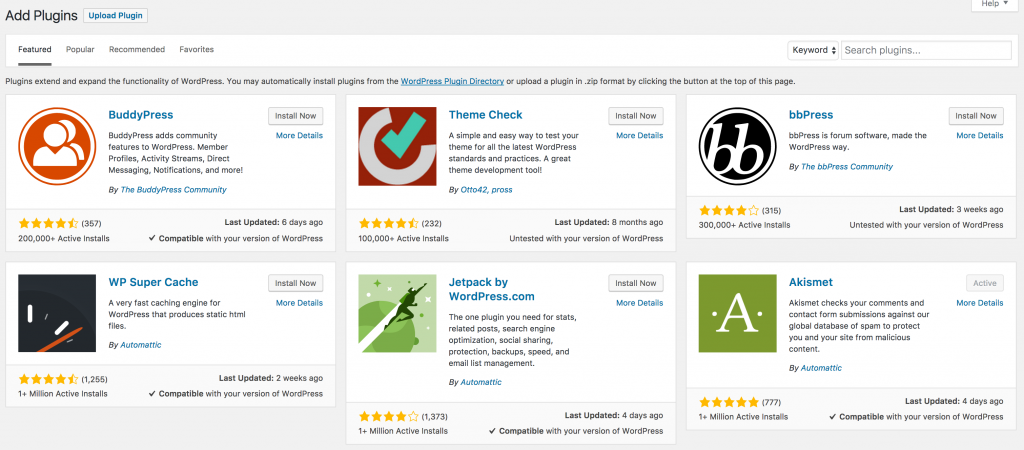
To add a plugin manually, go to your WordPress admin area, select Plugins on the left hand panel and then click Add New. You’d be taken to a page that looks something like the one in the image below. In the keyword area enter the theme or search term for what ever plugin you are looking for. In this case, enter All-in-One SEO or what ever search term you desire. Choose the most relevant plugin and click install. Follow the installation instructions. It’s that simple.
Try not to get carried away with plugins. The more plugins you have on your website, the slower your website will load. Slow websites typically drive traffic away and you want to avoid that.
WordPress Plugins
More Training on Building a Website
What I’ve covered here in this post “#1 How to: Building a Website from Scratch” are very basic steps to building a website. There are so many other elements you can add to your website to make it really hip and happening. But if you followed the steps here on this page you would already have a solid foundation. And you would have seen how easy it is to create a website from scratch. There are lot more training and information at the Wealthy Affiliate training platform. Click here to get instant access.
More Training on Building a Website – Wealthy Affiliate


Hi Kevon!
I wish I had your so analytical and great explanations while building my first website from the scratch. I can’t forget it! I’m sure that your step-by-step method and really valuable info will help many people without experience in building websites.
I agree with you regarding WA choice as a platform. I use it myself. It’s awesome platform with fantastic support and training.
Thanks for the excellent article!
Thanks Vesna. I really do hope that this how to guide on building a website from scratch will be useful to people now starting off. It took me a while to figure out all of these very simple points. So hopefully it will save new online entrepreneurs a lot of time, energy and money.
Hello Kevon
Very useful information. I am glad I used the WA as a platform to build my website, it was a relatively easy process. However I have not added the contact us page, is it required to do it for a website like mine on yoga or it does not matter what website it is, you still include it?
Thank you for sharing.
Ramandeep
If you want to build engagement and get a following, then yeah a Contact Us page is very useful. Sometimes visitors to your site may want to communicate with you but rather not do it publicly on the comments section. The Contact Us page gives them the privacy they may need. Hope this helps.
Kevon
Kevon, you have provided a thorough and easy to follow 6 step process for how to set up a website. I especially like that you point out the 4 key must have pages and then explained how to set up each one.
The images you have used are also of great help in understanding the process.
Overall your post gives anyone who is interested in creating their own website an excellent overview and a way forward to get started.
P.S. I love your logo! ~Jude
Hey Jude (I just had to say that LOL)
Thanks for your comment. I’m thrilled that you love the logo. I’m glad that this article on how to build a website from scratch was of help and that you think it will be useful for others.
All the best
Kevon
Super informative post! Didn’t leave any room for questions lol That’s fantastic! I love your approach and how thorough this article was, very beneficial! Thank you!
Thanks Courtney for your comment. I am pleased that you found this article on how to build a website from scratch beneficial and useful.
All the best
Kevon
You actually talk in English, not in technological tech babble. You know, like the type that the girl in the liberty commercial talks about….blahblahblah. This is going to be music to the ears of every website newbie. The big challenge will be to make this mobile friendly. Alot of info here
Hi Lisa,
Yes, I do talk in English. LOL. I try to write in a way that any reader can understand, regardless of age or technical experience. The grat thing about making a website mobile friendly, is that the themes provided within the Wealthy Affiliate SiteRubix area allow you to make your site responsive for mobile and tablets with a mere click of a button. It’s that simple. But I totally agree with you. You cannot build a website without ensuring that it is responsive – a.k.a. mobile ready.
Thanks for your comment
Cheers
Kevon
This is an amazing article and very helpful for all the people now starting off with their own site.
You have indicated everything that needed to startup a new website and build it from the scratch. The only stuff that they need to worry about their site after they follow all the instructions here are the content they need to put in their site.
The WA platform is also a good choice as I am using it now and the community and training lessons are very helpful with fantastic support. Amazing post!
All the best!
Charred R
Thanks Charred,
You are totally right, I tried to make it as simple and as comprehensive as possible so that literally anyone can build a website from scratch and as you can see, it is really easy, especially if you are using a powerful platform as the one provided at Wealthy Affiliate. And I also agree that content is now the next step in building an online business. A website is like the foundation and content are the building blocks.
Thanks for stopping by
Regards
Kevon
I really like the layout of the step-by-step instructions of building a website. Adding visuals is very important as it is a helping hand to those building their website and what to expect next. I personally use Wealth Affiliate and built my website through the courses. Your instructions explain to the user what they need, where they can start and where they can get more training. If I was a beginner in building a website, this post would give me a head start. Great post.
Sam
Thanks Sam,
I’ve seen your website and I think you did a great job. I also hope you took my advice about adding the opt-in feature for your free downloadable content. There’s great training at WA about that. And I believe capturing emails and building a customer base is critical to your online business. Even if you build a really great website, it is nothing without a solid base of visitors and eventually buyers. Stay tuned to my upcoming training on how to convert customers. In the mean time take a read of this post on the topic.
All the best
Kevon
Thanks for the post, I did not know about Google Forms and in web site building\hosting\content creation its a never ending learning curve! Im going to add a form to some of my sites shortly.
OK great Trevor. I am so glad that I was able to show you something new to make your website a winner. Contact me if you have any questions about building your website or about adding Google forms to your site. Best of luck!
Kevon
If only I found this article when I first started my blog, I probably would have seen success much faster, however, no need to worry. At least all your efforts can aid people in the website-building process now, so I thank you for that. I highly agree that an “about me” page is important for your blog. Without an about page you are a nobody, and people who land on the site will not trust the writer of the blog.
Thanks for your comments Brandon.Even though you did not get to check out this post before your started your blog, I’m sure you did a fantastic job at building your website. If you ever have any questions moving forward, don’t hesitate to contact me.
All the best
Kevon